Kid's Dungarees & Reinforced Seams - My 'How To' Guide to Reinforced Seams

I have recently begun making more little outfits for babies and kids and I am really enjoying the extra thought needed for such tiny pieces! My initial thought was to make an adult outfit in miniature but, as each pattern progressed, I realised that kid's clothes require a little extra work.
Dungarees, or overalls, as they are commonly called, are a great wardrobe staple for little ones as they offer a strong and durable outfit without the need for a waist band which can be uncomfortable and can lead to the need for regular 'pulling up' of trousers!
As I worked with the fabric for my dungarees I realised that the top section could easily be lined and bunch of seams hidden away but the trouser legs would have some seams on show. Not only will those seams need to be neat and smooth to avoid irritation, they will also need to be extra strong, particularly over the seat of the trousers.
For use with trousers there are two common reinforced seems, you will see these in most jeans. I tend to use both depending on the placement of any intersecting seams. Here is my guide.

What you will need:
Fabric cut according to your pattern
Pins or fabric clips
Ruler or tape measure
Step 1. Prepare your fabric by cutting out all sections of the pattern. I like to use my rotary cutter whenever possible as it gives clean, straight edges. Lay your pieces out ready for stitching.


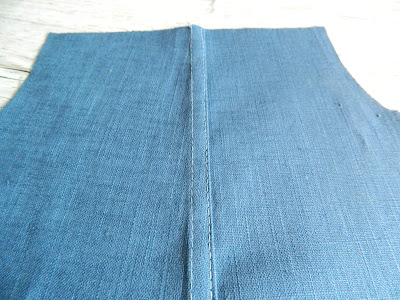
Stitch your first seam and press open your seam allowances so that they lay flat against the wrong side of the fabric. You can see that the raw edges of the fabric are already beginning to fray.

Fold your first seam allowance in half, tucking the raw edge under as you fold using pins to secure in place if required.


Repeat this process with the second seam allowance and press again. You will see that the seam allowances form a solid seam that can be seen from the front of the fabric.


When you are ready to stitch, line up your presser foot with the original line of stitching at the centre of your seam. This will keep your new stitching parallel to the centre of the seam. Sew the length of the seam as close to the folded edge as possible.


The second kind of reinforced seam hides away any raw edges with just one line of top stitching.
Step 1. Prepare your fabric ready for stitching as above. Sew your two pieces together and press open the seam allowances.

Step 2. Trim one of your seam allowances to approximately half of its width. Make sure to leave enough of an allowance to stop your original stitches from pulling through the edges of the fabric.

Step 3. Fold the larger seam allowance in half tucking it under the smaller seam allowance. Use pins to secure the folded seam allowance as required.

Press the folded seam again.

Step 4. When you are ready to sew line up the presser foot with the original line of stitching. This will keep the new line of stitching parallel to your original seam.

You will now have a two parallel lines of stitching running the length of a solid seam.
These two seams can be used together to create neat and tidy seams which are not too bulky, great for use with strong fabrics such as denim and corduroy. You can find the finished item here in my Etsy shop.
I would love to hear from you with your comments or questions. If anything is unclear I would love to hear from you and would be happy to answer any questions that you have.
Thanks for visiting!


Press the now folded seam with an iron.

Repeat this process with the second seam allowance and press again. You will see that the seam allowances form a solid seam that can be seen from the front of the fabric.


When you are ready to stitch, line up your presser foot with the original line of stitching at the centre of your seam. This will keep your new stitching parallel to the centre of the seam. Sew the length of the seam as close to the folded edge as possible.

Repeat with the second seam allowance now lining up the left side of the presser foot with the centre stitching.

You will now have two lines of stitching either side of, and parallel to, the centre seam. The inside of the seam will be firmly held down avoiding irritating loose raw edges which may fray. The outside has neat stitching which can compliment or contrast with the fabric colour.


This kind of seam is good for centre seams which will experience a lot of pull and that need to be flat, e.g. the side seam of a pair of trousers.
The second kind of reinforced seam hides away any raw edges with just one line of top stitching.
Step 1. Prepare your fabric ready for stitching as above. Sew your two pieces together and press open the seam allowances.


Step 3. Fold the larger seam allowance in half tucking it under the smaller seam allowance. Use pins to secure the folded seam allowance as required.


Step 4. When you are ready to sew line up the presser foot with the original line of stitching. This will keep the new line of stitching parallel to your original seam.


These two seams can be used together to create neat and tidy seams which are not too bulky, great for use with strong fabrics such as denim and corduroy. You can find the finished item here in my Etsy shop.
I would love to hear from you with your comments or questions. If anything is unclear I would love to hear from you and would be happy to answer any questions that you have.
Thanks for visiting!

Comments
Post a Comment